11/03/2013

Primary and secondary colours - Years 1 & 2

This is a lesson designed to prove that teaching about colours doesn't have to be limited to dictations, simple colouring or talking about your favourite ones. This CLIL lesson includes elements of Art, Music and Science. 
I have to mention about my assistant, Ms Ewelina Stus, who is also a teacher in my school and eagerly engages herself into CLIL lessons and their planning. Most of the activities were designed by her.

Aims: Students can name three primary and four secondary colours. They can do an experiment with milk and food colouring, they can sing a song about colours.


Task 1
I talk to my students asking whether they know any names of colours in English. I ask them some simple questions asking to indicate examples of these colours in the classroom. Then, I explain that today we are going to do some colourful magic. They are always intrigued hearing that :)

Task 2
I show them a song by Sesame Street.

After watching it a few times depending on students' willingness, we talk about the colours presented in the song and the whole process - if they have noticed what happens when two colours are mixed.
The conclusions should be:
blue and yellow = green
red and yellow = orange
red and blue = purple

Variation! If you have time and an access to the IWB a perfect idea would be to ask students to become these colours (as the men in the song) and try to mime as it follows.

Task 3
I introduce notions: "a primary colour", "a secondary colour", "to mix". Now we can go straight to the experiment.
I show the instruments: a plate, a paintbrush, milk, food colouring in three primary colours, dish soap.

I explain that this is the part with magic and I will need their help. Giving all the instructions in English we go through all the steps:
1. Pour some milk into the plate.


3. Drop some food colouring in three different places of the plate.


5. Touch each spot of paint gently and see what happens.


6. When you have all three secondary colours on your milk, stir everything up and see what colour you have now (brown as we get it when red, yellow and blue are mixed).

1. Pour some milk into the plate.
2. Wait until the milk is still.
3. Drop some food colouring in three different places of the plate.
4. Pour some dish soap onto the paintbrush.
5. Touch each spot of paint gently and see what happens.
6. When you have all three secondary colours on your milk, stir everything up and see what colour you have now (brown as we get it when red, yellow and blue are mixed).

IMPORTANT! The milk should be fat about 3%. Less fat can result in the failure of the experiment.

If you have some time left or your experiment has failed - show this film.


Task 4

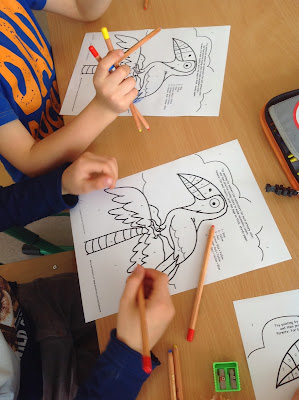
Especially for this lesson I bought some dry pastels in three primary colours. Each student gets three pencils and using only them they have to colour the worksheet according to the instructions. This is also a chance to show them how to use this kind of pastels, how they can mix colours using their fingers etc.


Sometimes they have to exchange pastels as the number of them is limited and it is a chance to practise asking for objects: "Blue, please", "Here you are", "Thank you".

Task 5
We arranged a display of their works.


10/18/2013

What can you do with an interesting book?

Children's library can be inspiring. The idea was to teach a bit of science. I thought about life cycles. Then while looking for activities I realised that in my kids' bedroom I have an excellent book - a gift from their aunt living in the UK. "The very Hungry Caterpillar" is over 40 years old but still attracts children's attention. This book was a base for two different scenarios.

Years 1-2
As you know, the hungry caterpillar gobbles more and more every day. The whole story may be treated as a great way of revising/introducing (!) names of weekdays and/or plural forms not to mention food. The story is quite short and simple so accompanied by some worksheets makes the whole lesson. Exactly 45 minutes - perfect timing.

Years 4-6
The story tell us a lot about life cycle as well. It starts with a tiny egg laid under the leaf, reveals details of all the stages - egg, larva, chrysallis to end up with a beautiful picture of an adult butterfly. I used it as an introduction to a more "serious" teaching about a life cycle of butterflies.

Both lessons started with a short discussion about the topic. It is important to involve students into the topic by allowing them to brainstorm and say what they already know about the matter.

I described the schedule of the lesson and the book itself. Then, we watched a film and the book.

Years 1-2
I asked if they remembered what the catterpillar ate each day. Together we quickly revised dishes of all days. The next step was a hand-out found here. Children had to cut out and stick the dishes on the right weekdays. Evaluation? We simply watched the video again. I asked children to remind me the story asking them some questions:
1. What day does the caterpillar eat through an apple?
2. What does he eat on Friday?
3. What about Wednesday?
4. What on Saturday? (that is a difficult question even for me! But they managed as a group to answer it).
The catterpillars before colouring

The last task was to colour the food. All the works are hanging on our CLIL board.


Years 4-6
After watching the story I asked if they could elicit all four stages of the life cycle of the butterfly. I wrote their answers on the blackboard.
Then, I handed out two worksheets found on Education.com. Both of them describe and visualise the stages.
Life Cycle - education.com

A report about the Life Cycle of a butterfly - education.com

To check if the students were right we read the texts together and watched a film made by Chicago Nature Museum.
It is great as the timelapse technique shows perfectly the metamorphosis. What is more, the whole film has got subtitles, so it was easy to understand what was happening on the screen. For me - a great use, as I could find the best words to describe the processes.

Then, I distributed the last task - a pie chart about the monarch butterfly. It also comes from Education.com. Students cooperated in pairs trying to fill the chart according to the data provided in the task.
All of them were provided with a list of vocabulary to be learnt for the next lesson.

10/09/2013

Somebody to love by Queen

Sometimes the best ideas come to your mind out of the blue. This time I got to know, that I was supposed to hold a lesson with over twenty students aged 12. Two groups of various English level, a typical school class. First, I had to find a common topic, then make up a lesson in about 2 hours. The course of events led me from a chart with some basic vocabulary straight to Zanzibar. How come? Let me explain.
The students were to learn about prefixes like SOME, ANY, NO and EVERY. I prepared a chart that they copied to their notebooks. I knew that that lesson was just a start of something bigger, so I didn't care about the fact they they will not accomplish the learning process. The lesson was aimed at indicating that there is such an element of English grammar and vocabulary. I had only 45 minutes, so the amount of time I could spend explaining grammar was also limited. What is more, during the lesson it was clear that most of the students knew the vocabulary perfectly. I just had to organise their knowledge.
After introducing words like "somebody, anybody, anywhere, nowhere, everything" etc. we moved to more exciting tasks.
Task 1 - "Somebody to love"
I asked the students whether they had ever heard about the band Queen. I was not sure of the answer in the age of Justin Bieber but to my surprise and relief they could even elicit some titles of their hits! Amazing! Then, it was an easy job to encourage them to listen to the song, which is full of the words I wanted to revise.
Before listening to this piece of music, students were given the lyrics and their job was to underline all the words of the lesson and notice in what kinds of structure they are used (somebody for positive sentences, anybody for questions and so on). After analysing this part, we had a chance to enjoy the masterpiece.
Task 2 - Mercury Rising
Then, I asked them what they knew about Freddie Mercury. After receiving some information on his biography, I handed out a reading task that comes from "Inside Out" by Macmillan. The text is not easy for students of primary school, but they managed to scan it and choose the right aswers in the quiz. Definitely, they succeeded in improving this exam technique which was one of the aims of the lesson.

Task 3 - Zanzibar
Well, I have to say that this lesson is an outcome of my fascination. With every moment of preparations I got more and more interested in Mercury's biography. The most shocking information for me was that he was born on this beautiful tropical island of Zanzibar. I decided to show my students how picturesque it is.

And that was the end of our lesson. Unfortunately, I have no chances to continue with the whole class, but the next thing my group is going to do is to deepen their understanding of the grammar topic itself. Maybe we will use the knowledge in some kinds of activities? I am waiting for an inspiration to come :)

Mind maps - Years 4-6

Mind mapping is quite popular but as a tool of creative thinking doesn't exist in Polish primary schools . For my students it a novelty so I spent a lot of time explaining why it is in use. As I ran this lesson is several age groups I tried different scenarios - sometimes the topic changed, sometimes I omitted a few parts of the lesson plan.
I always started with asking my students how they prepare and plan their birthday parties. If they even make a list of tasks. Then I told them why a list is not a perfect tool - limited space, hierarchical order, linear way of expression, hard to remember, missing colours and other visuals.
Then, we analysed the picture shown below:

Now it was a time for variations. Depending on the students' language level and ability of self-studying I gave tasks:
1. Make a mind map titled "ME" - individual work
2. Make a mind map "Ideal day" - group/pair work with a lot of help of the teacher (tips on categories and vocabulary)
3. First, in groups, prepare a list of all the words and phrases that come to your minds while thinking about "Ideal Birthday". Then, try to group the phrases into categories, name them, transfer the data into the mind map. (The process illustrated below):

Students brainstorm and write down phrases connected with ideal birthday

After organising the data into the categories, they construct a mind map


Use of colours for groups helped them organise the data

Students transferred all the data into the mind map
The collection of mind maps is vast. Some groups were asked to present their works to others, some discussed the outcome in their own groups. All the products are hanging in the classroom so that the rest of students might admire what we did in our classes. The profits of the lesson? Some of the students use mind mapping technique as a method of brainstorming and organising data for different topics and ideas.


At the end of the presentation you can distribute a checklist to evaluate the project in a formative way. The homework - a list of vocabulary that is a result of the brainstorming. To be checked at the next lesson - a summative form ( a test).

9/23/2013

The Bucket List of Junior High School Students

This time not about CLIL itself but another great example of students' creativity. When I told my colleagues that I planned to follow this lesson, they laughed. Well, some might say that 15-year-old students won't be able to talk about death or dreams. I was also a little bit afraid of the results, but they managed to fullfill all the tasks.
The lesson was based on the film "The Bucket List" (2007). This is a story of two elderly men who get to know they're terminally ill. After considering all possible solutions they decide to make a list of wishes and dreams and simply spend the rest of their time following it. It's called a bucket list (for there is a saying "to kick a bucket" that means "to die"). On their list there are: skydiving, climbing Mount Everest, speed driving, kissing the most beautiful woman in the world and many others.
I started the lesson with reminding the expressions:
to kick the bucket, a bucket list, things to do before you die etc.

I asked the students to elicit some possible things people may have on their lists. Then we made use of the task produced by Lessonstream.org (points 3-5).

The next step was to watch a piece of the film & familiarize them with the plot.
 

 Naturally, it was the moment for the students to start thinking about their personal lives and choices. I asked them to imagine that there were no parents above them (as in an adult life nobody is going to tell them what to do) and they had an unlimited access to money as it was shown in the film. I estimated that 10 minutes would be enough for them to write down the ideas. To my amazement they were simply unstoppable - their lists were full of ideas, long and interesting. Of course, many of the points were so funny I just couldn't stop laughing.
Below I placed some of the examples:
  • to do bungee-jumping
  • to become a Pope and say that God doesn't exist
  • to be completely prepared for an English test
  • to win a talent show (having no talents at all)
  • to go to Africa and participate in a safari
  • to make a tattoo
  • to have a bath in chocolate
  • to make a party for 10000 people
  • to overspeed on the highway
  • be famous all over the world
  • jump with parachute
  • to be licked by a llama
  • to have my own series of perfume
  • have a room where there will be wardrobes instead of walls and these wardrobes will be full of shoes!
  • go to the Arctic
  • go to the USA
  • run around the city in a chicken fancy dress
  • to go to the outer space
  • to have a son with a beautiful woman
  • to visit the most exclusive hotel in the world
  • to beat a world record and become the oldest person ever!
I have to say that the range of "dreams" was vast - from ridiculous and weird to really typical ones.


The last activity that I also found at lessonstream.org was The Lying Game.
We took some of the ideas that appeared during the lesson and started an interview that aimed at proving that the interviewee was lying. Well, I cannot say that the students were thrilled but they were very communicative and willing to participate. Thanks to this activity we practised "Have you ever..." structure as well as the pattern of asking further questions in Past Simple tense.

Total time: 45 minutes
 Level: B1/B2
No of students: 5-6
Age Group: Teenagers


9/19/2013

Pablo Picasso in the 6th Grade

This lesson was a first one in the 6th Grade. The topic was chosen by a coincidence. I just came across www.picassohead.com and simply knew I HAD TO make use of it.

AIMS:

To get to know some details of Picasso's life; understand notions like "cubism", "abstract", "angle", recognise the most important pictures of this author; prepare a Picasso-like painting online; give a short presentation;

Task 1

Ask students some LOTS and HOTS questions:
Who is a painter? What painters do you know? Who is your favourite one? Why do you like their masterpieces? Have you ever heard about Pablo Picasso? What do you know about him? What did he paint?

Asking these questions makes your students more attracted by the topic.

Explain the aims of the lesson.

Task 2

Show them a film without stopping, asking them about what is being painted (their answers were: bacteria, roses, a fish, a rooster/chicken). This film shows a real mastery of Picasso.

Task 3

Children are given copies of Picasso's biography. I simplified the text so that they had no bigger problems with understanding. Then they try to answer some of the questions concerning the contents of the text - discussion.
Ask them about more complicated vocabulary. Then they note down new words - both content and compatible ones.

Task 4

Divide students into groups of 3-4. Each group is given a set of 7 photos and their titles. Their task is to match them into pairs. This is a funny activity taking into consideration cubism ;) Sometimes they have problems to figure out the right position for the painting :)


Task 5

No teacher assessment again. Instead play this film:
Here they can find all of the paintings from the task. If there are any mistakes (and there always are) they correct them alone. Afterwards, you can discuss together the content of the pictures trying to recognise some characteristic elements.


Task 6 - homework

Each student has my email address and we also try to work online via Edmodo. This time their homework is to create a Picasso-like painting by means of www.picassohead.com and then send it to me. At the next meeting they will be asked to tell the rest of the group something about their project. Functional language used here - phrases to describe location plus body parts (mainly head).
Examples of students' works

Examples of students' works


My pocket money – about saving and spending - Maths in CLIL

Let me present the lesson that is my first using this approach. The guinea pigs in this research were the 5th grade students. The photos were taken during their work. All the groups managed to fullfill all the tasks although in different time - some finished much before the end of the lesson, the others left the classroom with some homework.

AIMS:

learning about various graphs and charts; filling in a questionnaire about ways of spending pocket money; drawing and labelling a bar graph and a pie chart;

Task 1:

Explain the aims of the lesson. Ask your students some LOTS and HOTS questions:

What is pocket money?  Do you get it from your parents? If yes – how often? Who gives you the money? What do you usually do with this money? Do you save it all? What are you planning to buy soon?

Explain that now you are going to practise some graphs and charts.

Task 2

Divide students into groups of 2-4 people. Each group gets a set of 4 pictures and 4 tiles with names of various graphs. their task is to match the picture and the name basing on their previous knowledge.


Task 3

Hand out a worksheet about the bar graphs. Thanks to this activity students will check if they understand how to read one.

Task 4

This activity includes organizing data into the tally chart and trasferring it to the bar graph. The students really appreciated it. 

Task 5

Depending on the number of students either divide them into groups of 6-8 or do the task with the whole group. You can do it on the blackboard or hand out the ready-made questionnaire.
The task is to ask the students to give/choose three ways that they spend their pocket money. From my experience it is better to ask them to construct the questionnaire together on the blackboard and then fill it in making a tally chart.

Task 6

 You ask the students to make groups of 2-4 people and draw a bar graph based on the data you have collected about ways of spending their pocket money.

Task 7

To introduce group evaluation of the work, you hand out the checklist. It's written in L1 to make it understandable and clear. The students have to stay objective answering and assessing their input.

Task 8 - homework

I have also prepared an extra activity for fast learners. It's about a life cycle of a monarch butterfly. This worksheet asks them to transfer data into a pie chart.

WHAT I MISSED ON PURPOSE

Functional language - I decided to limit their first meeting with CLIL to the basics. I don't want to overwhelm them with amount of new vocabulary.
Discussions and presentations - the problem of Polish students in general is the reluctance towards speaking in English in public. I think I will overcome it gradually with time.